
There are a bunch of colorful wires behind the car stereo which are called wire harnesses. When you see these wires you become astonished and confused. The first question arises in your mind: how will I connect and manage these wires?
Here the Pioneer Wiring Harness Color Codes take entry and help you to connect these rushes of wires one by one to their respective components.
With the help of these colors, you can easily configure which color wire will be connected to the speakers or different components of the cars.
Table of Contents
PIONEER WIRING HARNESS COLOR CODE – A GENERAL EXPLANATION
First, I have decided to eliminate your confusion about color codes. Let’s have a deep look into the general explanation of these color codes.
After that, I have also inserted a diagram, so you can easily understand the concept of harness color codes.
The below-mentioned wiring harness color codes and diagrams are equally applicable for DEH, MVH, AVH-X Models, and AVH-120BT.
Pioneer Harness Color Codes For DEH, MVH, AVH-X Models, and AVH-120BT Yellow Wire – 12V Constant
The yellow wire which is termed as memory wire is used to give the power to the car stereo.
It saves all the previous data like the clock setting or the song you are listening to before turning the stereo OFF.
Red Wire – 12V Ignition
Yellow wire provides the power to the stereo even when the ignition is turned OFF but the red wire only gives the power when the ignition is ON.
The red wire should be connected to the ignition switch.
Black Wire – Chassis Ground
This is a ground wire. It should be connected to any metal like chassis screw etc.
Black/White Wire – Factory Amplifier
When you buy a car, there is a default or factory amplifier already installed in it. Black/white wire acts as a grounded wire for that factory amplifier.
It should also be connected to a chassis screw or something like that.
Blue Wire – Antenna Power
The function of Blue wire is not permanent. It varies according to the color harness or car stereo. However, the main function of this wire is to provide energy to the antenna.
Blue/White Wire – Amplifier Turn ON
This wire is used to turn ON the amplifier.
Orange Wire – Dash Illumination (12V)
The orange wire is used for illumination dimming when the headlights of the car are turned ON.
Orange/White Wire – Dash Light Dimmer Control
This wire helps to control the brightness of the car dashboard. In the day time, it brightens the dashboard and at night time it dims it.
Orange/Black Wire – Dimmer Ground Wire
This wire is used as the dimmer ground wire and ground the current coming from orange and orange/white wires.
Brown Wire – Audio Mute
This is the mute wire of your car’s audio system. Sometimes you have to mute your audio while driving, it helps to do so.
White Wire – Left Front Speaker (+)
This is the positive wire used for the left front speaker.
White/Black Wire – Left Front Speaker (-)
This is the negative wire used for the left front speaker.
Grey Wire – Right Front Speaker (+)
This is the positive wire used for the right front speaker.
Grey/Black Wire – Right Front Speaker (-)
This is the negative wire used for the right front speaker.
Green Wire – Left Rear Speaker (+)
This is the positive wire used for the left rear speaker.
Green/Black Wire – Left Rear Speaker (-)
This is the positive wire used for the left rear speaker.
Purple Wire – Right Rear Speaker (+)
This is the positive wire used for the right rear speaker.
Purple/Black Wire – Right Rear Speaker (-)
This is the negative wire used for the left rear speaker.
These settings and color combinations are universal. You can’t change them.
PIONEER WIRING HARNESS COLOR CODES DIAGRAM AND CHARTS


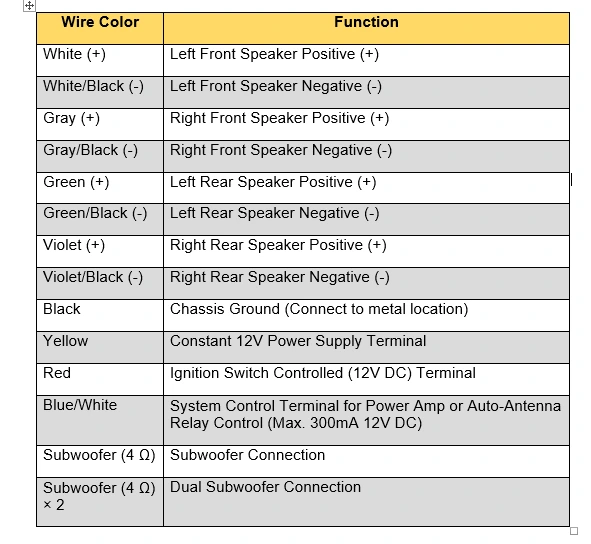
Pioneer MVH-S21BT (Single Din) Color Codes Chart
Here the 16-pin wiring and color codes will be applied while connecting the rear and front speakers.
Pioneer DMH-100BT (Double Din) Color Codes Chart

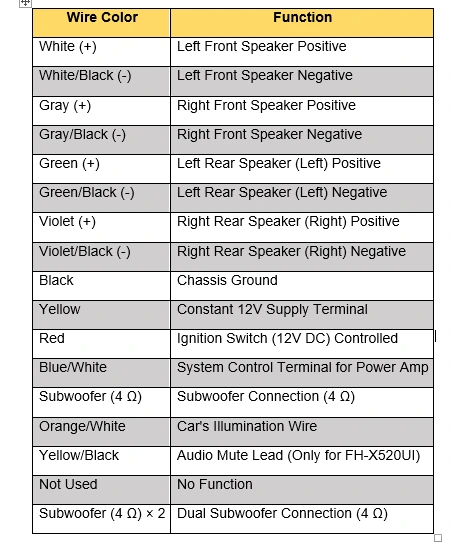
Pioneer FH-X720BT (Double Din) Color Codes Chart
Here the 14-pin wiring and color codes will be applied while connecting the rear and front speakers.
SOME TIPS WHILE DEALING HARNESS COLOR CODES
Check The Wire Size
Ensure that the wire size of your car stereo should be compatible with the subwoofer or speaker.
Every subwoofer can only work perfectly when it is connected via suitable wire sizes according to their resistance and sizes.
Measure The Voltage First
Now it’s time to measure the current, voltage, and resistance of all the wires present in the harness.
You can use a multimeter to measure these parameters.
First, you need to turn ON the car ignition and then you have to measure the voltage of these wires.
If any of the wires is not showing any reading, you should replace it.
Always Watch Chart On Your Laptop
Pioneer wire harness color codes are surely confusing and intermixing for beginners. Therefore I recommend you open the above chart on your Laptop or any big screen and keep it with you.
Keep looking at the chart while connecting wires so you can remain focused.
Check Out The Speaker’s Loudness
If you have connected all the wires correctly and still your speakers are not sounding, you have to do two things.
First of all, check the Yellow and Red wires, they should be connected and working well. Second, you may have to make your speaker louder.
Same For All The Subwoofers And Vehicles
The above-mentioned harness color codes are equally applicable for every type of vehicle, whether you are going to install a subwoofer in a single cab truck or your SUV car.
It only varies according to the model of stereos.
Use an External Harness Adapter
There are many wiring harness adapters available in the market which make this process very easy.
Some car stereos don’t have harness wires, they should be connected via a harness adapter. Keep in mind that these adapters are stereo-model specific.
INSTALLATION GUIDE ABOUT PIONEER WIRING HARNESS COLOR CODES
Nullify The Power
First of all, disconnect all the battery wires to prevent any electric shock or mishap.
Check Out The Wire Harness
Now see the wire harness, it will be behind the stereo. Put out the stereo from the dashboard and there you will see a bunch of colorful wires.
You have to identify these wires very carefully and connect them according to the given chart.
Ground Wire Is Important
Please don’t forget the ground wire. It is most important for not only working the stereo properly but also for your and passenger’s safety.
The black wire is the ground wire. Take it and connect it with any chassis screw or other metal.
Double Check The Wiring
After you, the wiring is done. Recheck it and ensure that all the wires are connected to their respective components and these are working well.
Reconnect The Battery Wires
Now reconnect the battery wires and turn ON the stereo and subwoofer or speaker.
I hope it is working well. If not, check the power cable first and then all the other harness wires. Ensure that the stereo is properly connected to your speaker and it is also working well.
CONCLUSION
I hope that you have thoroughly seen the pioneer wire harness color codes and their way of installation.
I know this is a little bit irritating for those who are doing this for the first time. I highly recommend that you do it carefully so you don’t have to do it again and again.
All the stereo models also come with proper harness color code identification and installation guides. You should read it carefully.
What If My Pioneer Wiring Harness Color is not working?
Here are some golden remedies, you should follow if you are facing some trouble. First of all, check out the battery wires and then all the connecting wires of the harness. Check out the volume and loudness of the speaker.
Try to turn ON the ignition again or reconnect all the wires otherwise.
What Is The Importance Of These Colors?
Colors act as identifiers. With the help of colors, you can easily configure which wire should connect to this specific component.
When any of the wires get damaged, you can easily identify the damaged wire because of its color.
Can I Add Some Additional Features to the Wiring Harness?
Yes, you can add some extra wires to increase the performance of your car stereo. But sometimes it becomes so disgusting or hard to handle.
Therefore I will recommend you consult an expert if you want to upgrade it.
Which Wire Color Used For The Remote In The Wire Harness?
The blue/white wire is usually used for remote functions for the car stereo.